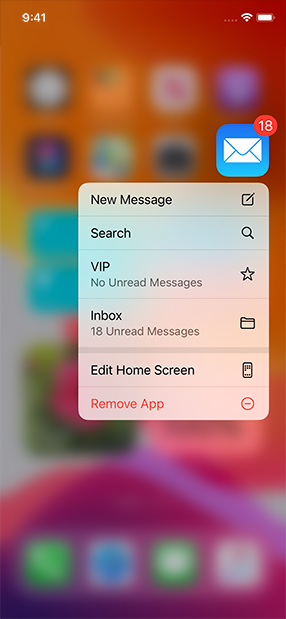
A long-press or force touch on the iOS app icon brings a menu called home screen Quick Actions. Developers can put up to 4 buttons there for compelling, high-value tasks. It is a UIKit functionality, but you can use that in your SwiftUI app, too.
How to add Quick Action?
There are two kinds of quick options - dynamic and static, and you can mix them.
- Static ones are easier to add, but you can’t control their content and when they are displayed.
- You manage when and which dynamic action to add during your application lifecycle. You can pass additional data to them and adjust titles according to the situation.
How to add a static Quick Action?
Static actions are defined in your project Info.plist file. Open this file as a source code (Right button -> Open As -> Source Code) and add a new element like the one below before the last </dict> tag.
<key>UIApplicationShortcutItems</key>
<array>
    <dict>
        <key>UIApplicationShortcutItemIconType</key>
        <string>UIApplicationShortcutIconTypeSearch</string>
        <key>UIApplicationShortcutItemSubtitle</key>
        <string>Search for a message</string>
        <key>UIApplicationShortcutItemTitle</key>
        <string>Search</string>
        <key>UIApplicationShortcutItemType</key>
        <string>search</string>
    </dict>
</array>
By modifying values between <string> and </string> tags, you can adjust an icon, title, subtitle, and type (identifier returned to the code).

How to add a dynamic Quick Action?
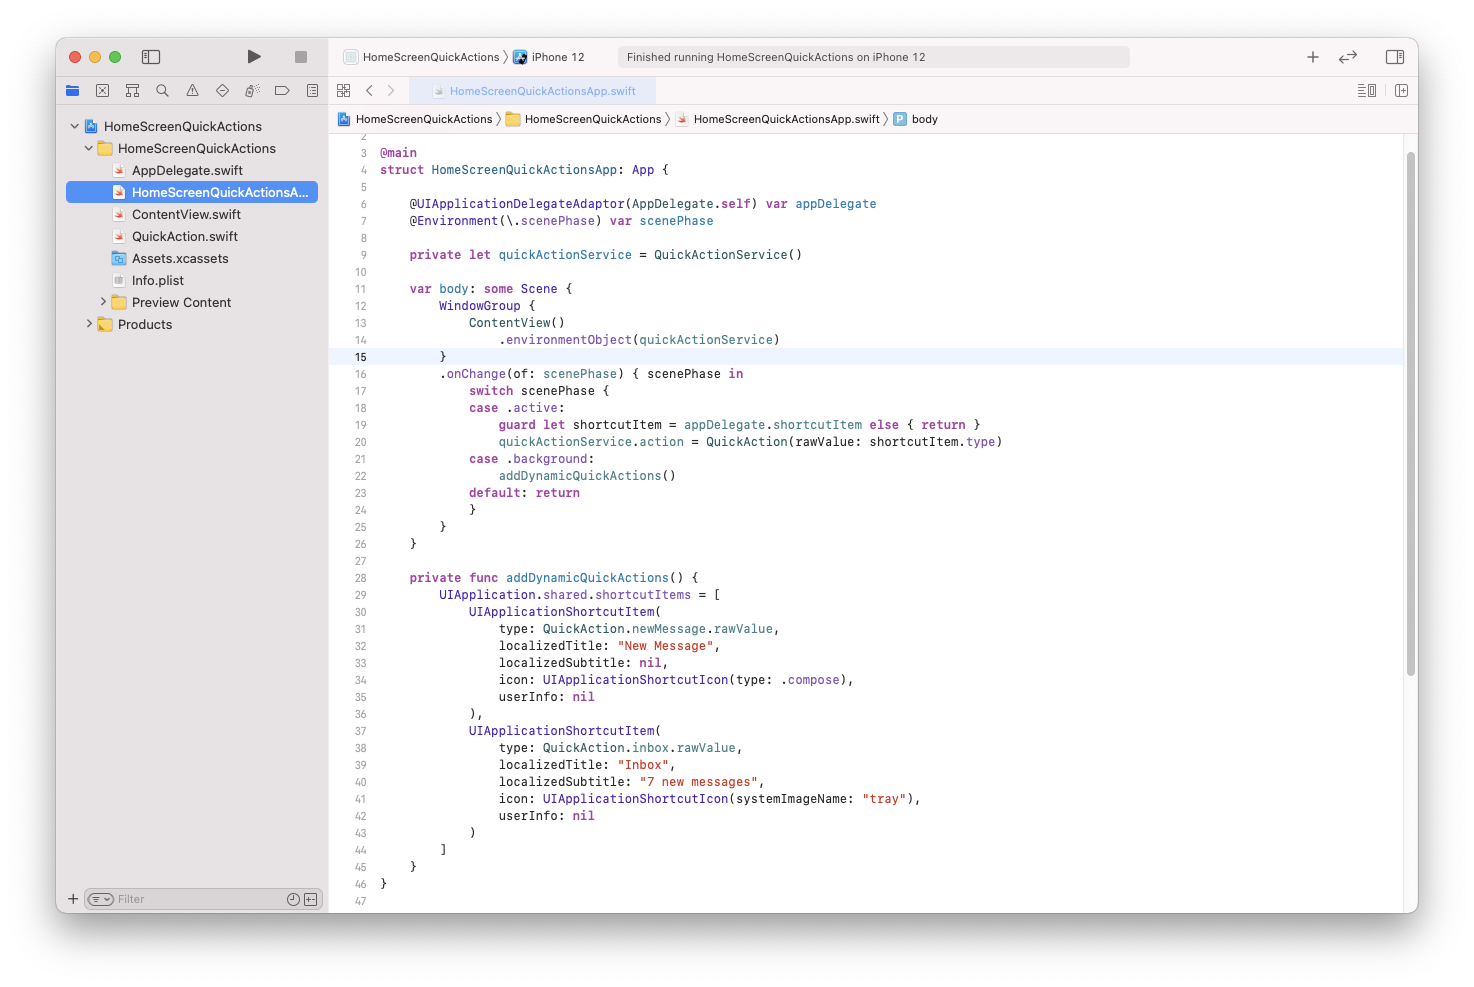
As mentioned previously, you should add dynamic Quick Action in your code. The best place to do this is when the application goes to the background. You can achieve this by using the @Environment property wrapper and observing the ScenePhase environment value.
@Environment(\.scenePhase) var scenePhase

var body: some Scene {
    WindowGroup {
        ContentView()
    }
    .onChange(of: scenePhase) { scenePhase in
        switch scenePhase {
        case .background: addDynamicQuickActions()
        default: return
        }
    }
}
Dynamic actions can be set to UIApplication.shared.shortcutItems property. You have to provide an array of UIApplicationShortcutItem objects. The initializer of this object looks like this:
UIApplicationShortcutItem(
    type: String,
    localizedTitle: String,
    localizedSubtitle: String?,
    icon: UIApplicationShortcutIcon?,
    userInfo: [String: NSSecureCoding]?
)
Only type (a string that works as an identifier of a given action) and localizedTitle are required, but you can also set localizedSubtitle, icon, and map of additional data.
private func addDynamicQuickActions() {
    UIApplication.shared.shortcutItems = [
        UIApplicationShortcutItem(
            type: "newMessage",
            localizedTitle: "New Message",
            localizedSubtitle: nil,
            icon: UIApplicationShortcutIcon(type: .compose),
            userInfo: nil
        ),
        UIApplicationShortcutItem(
            type: "inbox",
            localizedTitle: "Inbox",
            localizedSubtitle: "7 new messages",
            icon: UIApplicationShortcutIcon(systemImageName: "tray"),
            userInfo: nil
        )
    ]
}
It is worth to note that UIApplicationShortcutIcon support SF Symbols.
How to handle a Quick Action call?
Until this point, you won’t see anything unusual, but to handle Quick Actions, you have to add UIApplicationDelegate. With SwiftUI App protocol, you can use another property wrapper - UIApplicationDelegateAdaptor to register your app delegate.
@UIApplicationDelegateAdaptor(AppDelegate.self) var appDelegate
In scene based application, Quick Actions can report in two different places. For a cold run, you will get shortcutItem from
func application(
    _ application: UIApplication,
    configurationForConnecting connectingSceneSession: UISceneSession,
    options: UIScene.ConnectionOptions
) -> UISceneConfiguration
method of UIApplicationDelegate protocol. And when the application is already active, UIWindowSceneDelegate takes charge and reports actions taps using
func windowScene(
    _ windowScene: UIWindowScene,
    performActionFor shortcutItem: UIApplicationShortcutItem,
    completionHandler: @escaping (Bool) -> Void
)
To handle both cases, your AppDelegate may look similar to this one.
import UIKit

final class AppDelegate: NSObject, UIApplicationDelegate {

    var shortcutItem: UIApplicationShortcutItem? { AppDelegate.shortcutItem }

    fileprivate static var shortcutItem: UIApplicationShortcutItem?

    func application(
        _ application: UIApplication,
        configurationForConnecting connectingSceneSession: UISceneSession,
        options: UIScene.ConnectionOptions
    ) -> UISceneConfiguration {
        if let shortcutItem = options.shortcutItem {
            AppDelegate.shortcutItem = shortcutItem
        }

        let sceneConfiguration = UISceneConfiguration(
            name: "Scene Configuration",
            sessionRole: connectingSceneSession.role
        )
        sceneConfiguration.delegateClass = SceneDelegate.self

        return sceneConfiguration
    }
}

private final class SceneDelegate: UIResponder, UIWindowSceneDelegate {
    func windowScene(
        _ windowScene: UIWindowScene,
        performActionFor shortcutItem: UIApplicationShortcutItem,
        completionHandler: @escaping (Bool) -> Void
    ) {
        AppDelegate.shortcutItem = shortcutItem
        completionHandler(true)
    }
}
You probably noticed unusual code in AppDelegate class:
var shortcutItem: UIApplicationShortcutItem? { AppDelegate.shortcutItem }

fileprivate static var shortcutItem: UIApplicationShortcutItem?
I added this static variable because Scene delegate and AppDelegate are not connected. That way, updates from both classes are available in one place, but since this is fileprivate, you can only access it using shortcutItem value on AppDelegate instance.
.onChange(of: scenePhase) { scenePhase in
    switch scenePhase {
    case .active:
        guard let shortcutItem = appDelegate.shortcutItem else { return }
        // handle action here
    case .background:
        addDynamicQuickActions()
    default: return
    }
}
In the attached example, you can find ObservableObject called QuickActionService that stores given Quick Action:
import Foundation

enum QuickAction: String {
    case newMessage, search, inbox
}

final class QuickActionService: ObservableObject {
    @Published var action: QuickAction?

    init(initialValue: QuickAction? = nil) {
        action = initialValue
    }
}
and environmentObject modifier that sends it down to other views.